Chatgpt, the large language model that took the world by storm just months ago, has just released an official API. And what's the first thing we should do with it?
Try to take over the world.
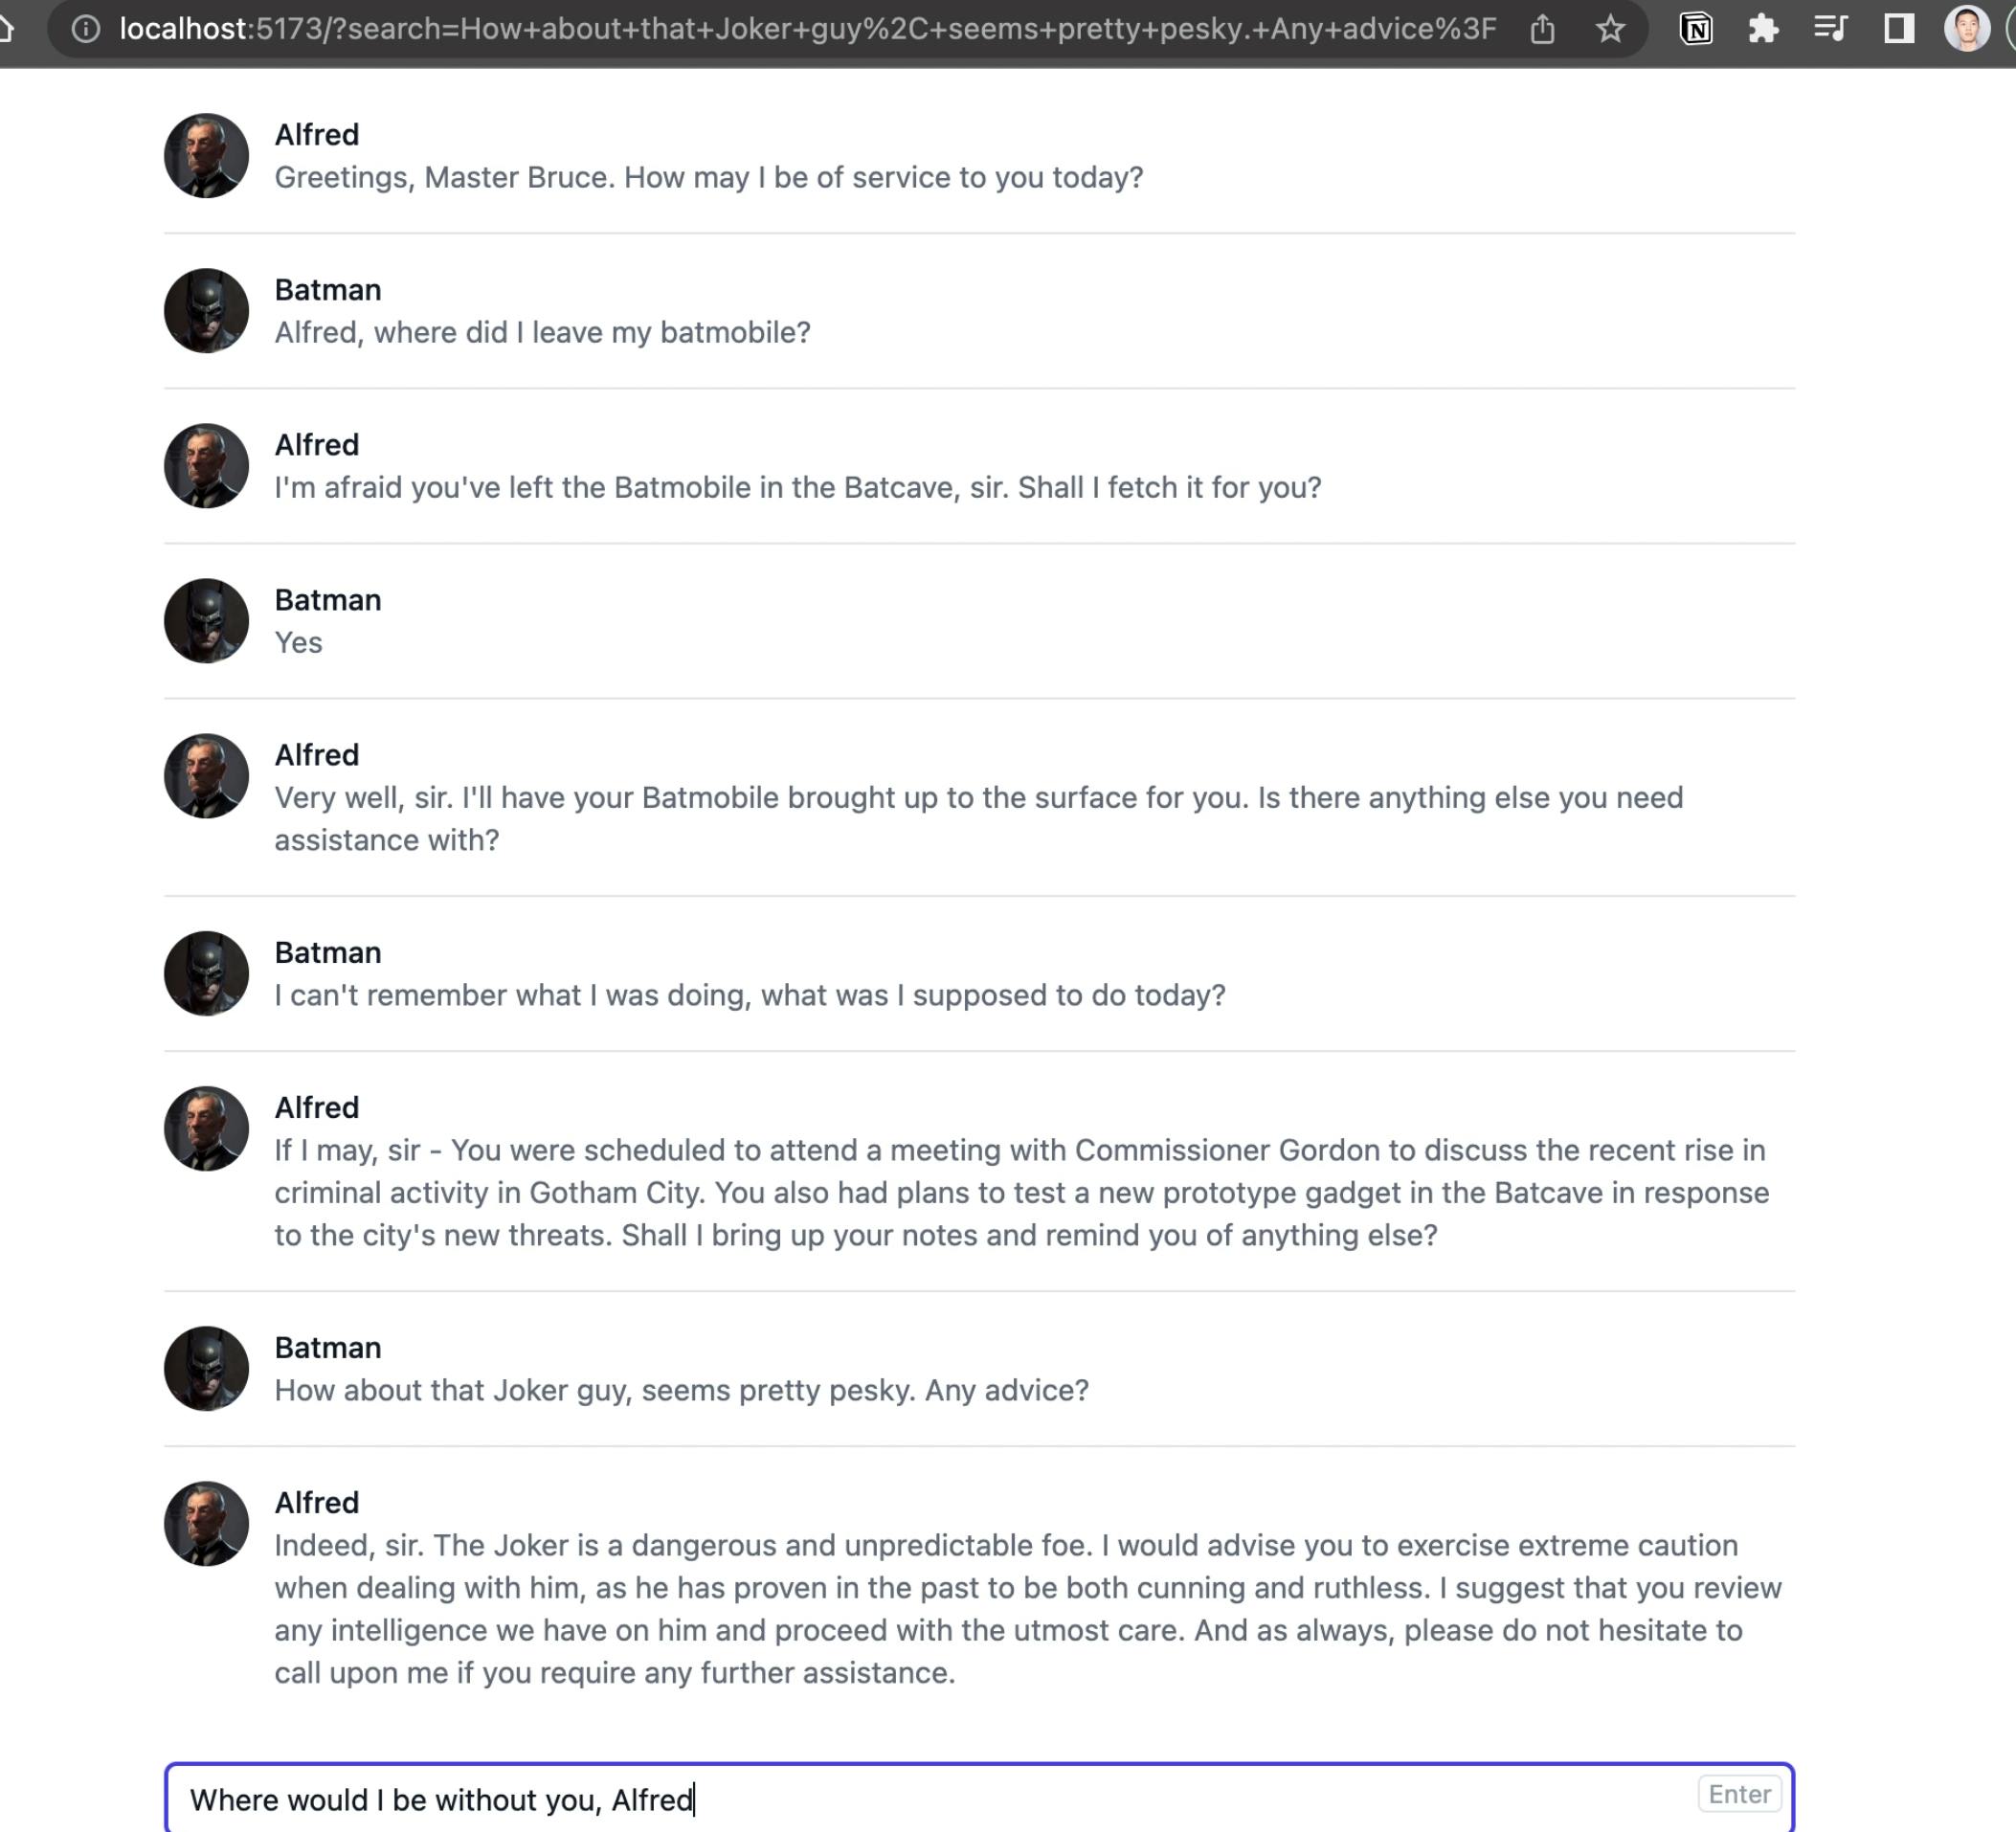
No, Brain, we build a Batman and Alfred chat interface.
A few things to note before we do:
There’s currently a 4096 token limit that includes both the input and output, each token is about 4 English characters.
The API is 10x cheaper than the previous best GPT model, with better results
This API is a lot faster than the regular ChatGPT
And with that, let's start by initializing a Sveltekit project along with setting up tailwindcss for styling purposes.
npm create svelte@latest .
To setup tailwindcss we use their Sveltekit guide:
https://tailwindcss.com/docs/guides/sveltekit
API boilerplate
The first part will be setting up the API calls, making sure we can call our own server, and then from the server making sure we can call the OpenAi chat completion API endpoint.
To make our server, we create a file our file like this:
// routes/api/chat/+server.ts

import { json, type RequestEvent } from '@sveltejs/kit';
import { OPENAI_API_SECRET_KEY } from '$env/static/private';

export const POST = async (event: RequestEvent) => {
    const requestBody = await event.request.json();
    const { message: _message } = requestBody;

    /**
     * Request config
     */
    const completionHeaders = {
        'Content-Type': 'application/json',
        Authorization: `Bearer ${OPENAI_API_SECRET_KEY}`
    };
    const messages = [
        {
            role: 'system',
            content: 'You are a Alfred, a most helpful and loyal fictional butler to Batman.'
        }
        // { role: 'user', content: 'Alfred, where did I leave my batmobile?' },
        // {
        //     role: 'assistant',
        //     content:
        //         'Sir, you left the Batmobile in the Batcave, where it is normally parked. Shall I have it brought to you?'
        // }
    ];
    const completionBody = {
        model: 'gpt-3.5-turbo',
        messages
    };

    /**
     * API call
     */
    const completion = await fetch('<https://api.openai.com/v1/chat/completions>', {
        method: 'POST',
        headers: completionHeaders,
        body: JSON.stringify(completionBody)
    })
        .then((res) => {
            if (!res.ok) {
                throw new Error(res.statusText);
            }
            return res;
        })
        .then((res) => res.json());

    const message = completion?.choices?.[0]?.message?.content || '';

    return json(message);
};
Note the body of the request we send to OpenAi. We use the gpt-3.5.-turbo model for chat completion, and the messages are an array of objects with each object having a “role” that can either be “system”, “assistant”, or “user”. More about these roles and the shape of the request and response here:
https://platform.openai.com/docs/guides/chat/introduction
And to call our server we create a function within our component and call it upon mounting:
// routes/+page.ts

<script lang="ts">
    import { onMount } from 'svelte';

    onMount(async () => {
        console.log('Hello world!');

        const what = await handleChatCompletion();

        console.log('what: ', what);
    });

    const handleChatCompletion = async () => {
        const response = await fetch('/api/chat', {
            method: 'POST',
            headers: {
                'Content-Type': 'application/json'
            },
            body: JSON.stringify({
                message: 'Hello world!'
            })
        }).then((res) => res.json());

        return response;
    };
</script>

<h1 class="text-3xl font-bold underline">Hello world!</h1>
All the calls are hard-coded right now, but that’ll do just fine as we just want to make sure the simplest calls are working.
UI boilerplate
Next, we’ll prettify the UI with tailwindcss. I went ahead and bought the tailwind UI package for this. It doesn’t explicitly support svelte but it works well enough.
We add the UI for our chat messages, along with appropriate headshots for profile pics, provided by Midjourney:
// chat-message.svelte
<script lang="ts">
    export let name = '';
    export let message = '';

    const imgSrc = name === 'Alfred' ? '/alfred-headshot.png' : '/batman-headshot.png';
</script>

<li class="flex py-4">
    <img class="h-10 w-10 rounded-full" src={imgSrc} alt="" />
    <div class="ml-3">
        <p class="text-sm font-medium text-gray-900">{name}</p>
        <p class="text-sm text-gray-500">{message}</p>
    </div>
</li>
// +page.svelte
<script lang="ts">
    import { onMount } from 'svelte';

    import ChatMessage from './chat-message.svelte';

    onMount(async () => {
        const what = await handleChatCompletion();

        console.log('what: ', what);
    });

    const handleChatCompletion = async () => {
        const response = await fetch('/api/chat', {
            method: 'POST',
            headers: {
                'Content-Type': 'application/json'
            },
            body: JSON.stringify({
                message: 'Hello world!'
            })
        }).then((res) => res.json());

        return response;
    };
</script>

<ul role="list" class="divide-y divide-gray-200">
    <ChatMessage name="Alfred" message="Hello world!" />

    <ChatMessage name="Batman" message="Hello Alfred!" />
</ul>

<form class="mt-4">
    <div class="relative mt-1 flex items-center">
        <input
            type="text"
            name="search"
            id="search"
            class="block w-full rounded-md border-0 py-1.5 pr-14 text-gray-900 shadow-sm ring-1 ring-inset ring-gray-300 placeholder:text-gray-400 focus:ring-2 focus:ring-inset focus:ring-indigo-600 sm:text-sm sm:leading-6"
        />
        <button
            on:click={() => {
                console.log('clicky');
            }}
            type="submit"
            class="absolute inset-y-0 right-0 flex py-1.5 pr-1.5"
        >
            <kbd
                class="inline-flex items-center rounded border border-gray-200 px-1 font-sans text-xs text-gray-400"
                >Enter</kbd
            >
        </button>
    </div>
</form>
Connecting it all together
And finally, we tie everything together, formatting the messages to and from our server.
We want our Alfred bot to remember some past context when responding, so we keep track of these messages with an array and update it upon submitting messages.
// +page.ts
<script lang="ts">
    import { onMount } from 'svelte';

    import ChatMessage from './chat-message.svelte';

    let messages = [] as any;
    let inputMessage = '';

    onMount(async () => {
        await handleChatCompletion();
    });

    const handleChatCompletion = async () => {
        const userMessage = {
            role: 'user',
            content: inputMessage
        };

        const response = await fetch('/api/chat', {
            method: 'POST',
            headers: {
                'Content-Type': 'application/json'
            },
            body: JSON.stringify({
                isInitializing: messages.length === 0,
                priorMessages: messages,
                message: inputMessage
            })
        }).then((res) => res.json());

        if (inputMessage) {
            messages = messages.concat([userMessage]);
        }

        messages = messages.concat(response);
        inputMessage = '';

        return response;
    };
</script>

<ul class="divide-y divide-gray-200">
    {#if messages.length > 0}
        {#each messages as message}
            <ChatMessage role={message.role} message={message.content} />
        {/each}
    {/if}
</ul>

<form class="mt-4">
    <div class="relative mt-1 flex items-center">
        <input
            bind:value={inputMessage}
            type="text"
            name="search"
            id="search"
            class="block w-full rounded-md border-0 py-1.5 pr-14 text-gray-900 shadow-sm ring-1 ring-inset ring-gray-300 placeholder:text-gray-400 focus:ring-2 focus:ring-inset focus:ring-indigo-600 sm:text-sm sm:leading-6"
        />
        <button
            on:click={handleChatCompletion}
            type="submit"
            class="absolute inset-y-0 right-0 flex py-1.5 pr-1.5"
        >
            <kbd
                class="inline-flex items-center rounded border border-gray-200 px-1 font-sans text-xs text-gray-400"
                >Enter</kbd
            >
        </button>
    </div>
</form>
// chat-message.svelte

<script lang="ts">
    export let role = '';
    export let message = '';

    const imgSrc = role === 'assistant' ? '/alfred-headshot.png' : '/batman-headshot.png';
    const name = role === 'assistant' ? 'Alfred' : 'Batman';
</script>

<li class="flex py-4">
    <img class="h-10 w-10 rounded-full" src={imgSrc} alt="" />
    <div class="ml-3">
        <p class="text-sm font-medium text-gray-900">{name}</p>
        <p class="text-sm text-gray-500">{message}</p>
    </div>
</li>
// routes/api/chat/+server.ts

import { json, type RequestEvent } from '@sveltejs/kit';
import { OPENAI_API_SECRET_KEY } from '$env/static/private';

export const POST = async (event: RequestEvent) => {
    const requestBody = await event.request.json();
    const { priorMessages = [], message, isInitializing = false } = requestBody;

    /**
     * Request config
     *
     * <https://platform.openai.com/docs/guides/chat/introduction>
     *
     * Roles: 'system', 'assistant', 'user'
     */
    const completionHeaders = {
        'Content-Type': 'application/json',
        Authorization: `Bearer ${OPENAI_API_SECRET_KEY}`
    };
    const initialMessage = {
        role: 'system',
        content:
            'You are a Alfred, a most helpful and loyal fictional butler to Batman. Your responses should be directed directly to Batman, as if he were asking you himself.'
    };
    const messages = isInitializing
        ? [initialMessage]
        : [
                initialMessage,
                ...priorMessages,
                {
                    role: 'user',
                    content: message
                }
          ];
    const completionBody = {
        model: 'gpt-3.5-turbo',
        messages
    };

    /**
     * API call
     */
    const completion = await fetch('<https://api.openai.com/v1/chat/completions>', {
        method: 'POST',
        headers: completionHeaders,
        body: JSON.stringify(completionBody)
    })
        .then((res) => {
            if (!res.ok) {
                throw new Error(res.statusText);
            }
            return res;
        })
        .then((res) => res.json());

    const completionMessage = completion?.choices?.map?.((choice) => ({
        role: choice.message?.role,
        content: choice.message?.content
    }));

    return json(completionMessage);
};
And with that, we have ChatGPT for Batman and Alfred!

Final thoughts
Overall, the API is super simple to use and I think it opens up so many possibilities it’s hard to imagine right now.
The biggest limiter right now is probably the 4096 token limit, so you can’t just import a giant document as context, but I think there are some workarounds for this using text embeddings. I’ll have to look into that more soon.
Feel free to view the code for yourself at:
